
December 1, 2017 By adminCDS
Recycled Sunglasses for Rice & Carry
We’re very excited to finally have some real-life sunglasses in our hands made from waste polypropylene plastic left over from Rice&Carry’s bag making process.
From the time we began discussing products with Henry and Susi we had sunglasses in our minds, but knew that it would be a long road before we would be able to finally hold some in our hands.
Not into reading? You can watch the video then:
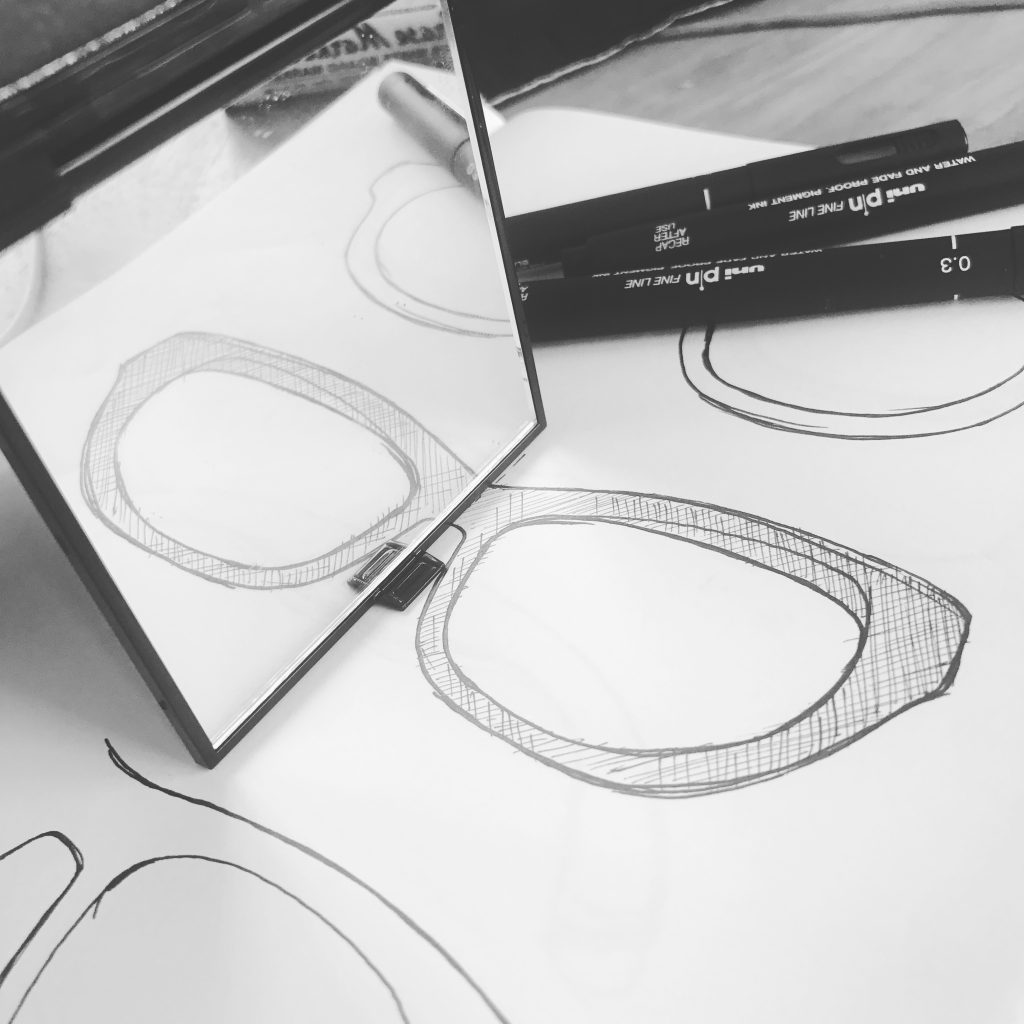
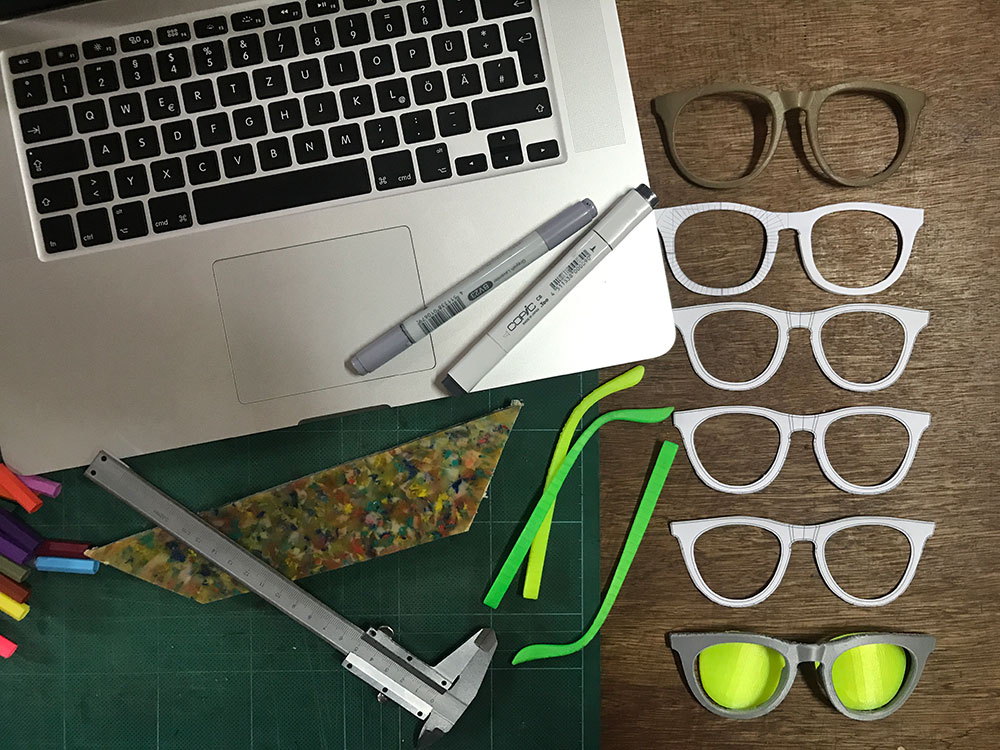
As usual we began by sketching up sunglasses shapes, our aim to be to arrive at a pair of sunglasses as uni-sex and appealing as possible, but still with some character of their own. We cut out each shape that we thought might be workable from card so that we could try them out on as many faces as possible… some were bonkers, some were silly, some were too plain or boring but after some discussion with the guys at Rice&Carry we landed on a form that we thought would be worth taking forward.
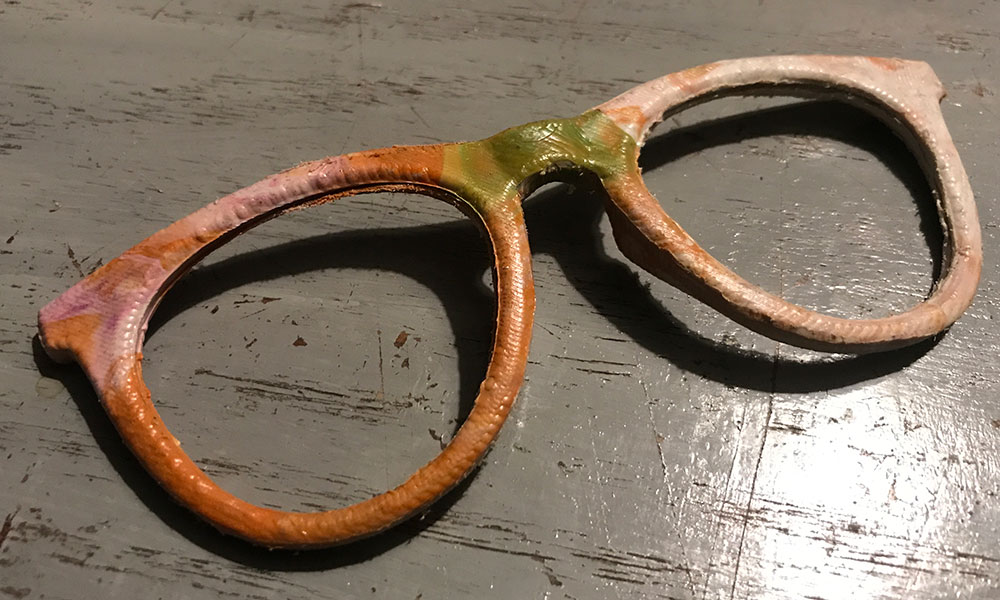
Once we had landed on a design that we collectively thought met our combination of unique and universal we sent them off to 3D Concept Studio to get them 3D Printed. To give you an idea of the printing costs in Sri Lanka, it cost us around Rs9,000, which is around US$60 or so, to print the frames, the arms and our lenses…. Which is a competitive rate, but illustrates the costs involved with designing and developing even something as apparently simple as a pair of sunglasses.

Upon reviewing the 3D print with Henry, we decided that for the capabilities of the Precious Plastic injection moulder, we’d need to give the rims a bit more thickness to make sure the plastic could flow around the full shape.
So we went back to Solidworks and revised the frame shape in line with our new design considerations. We made more card models, and ultimately a new 3D print to prove out the design.
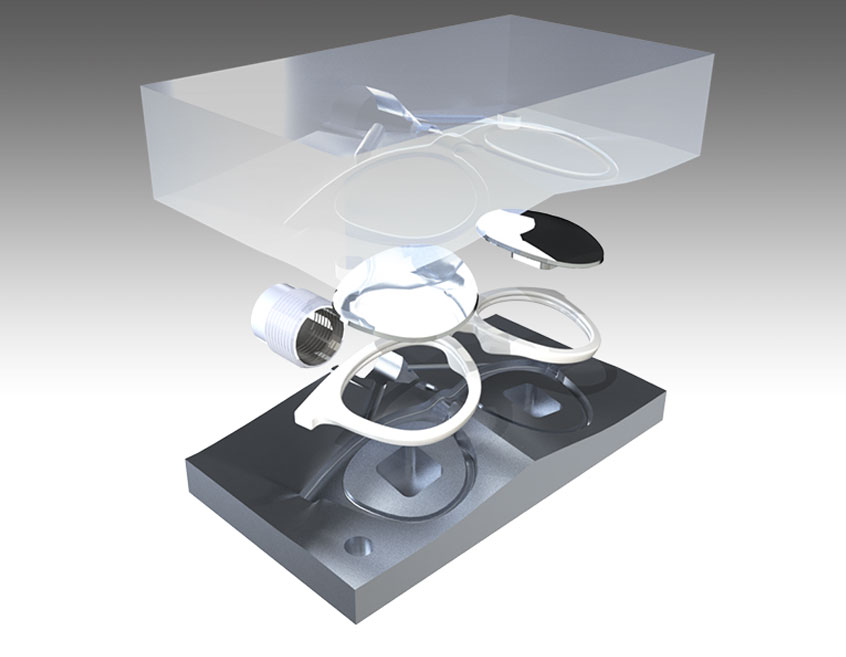
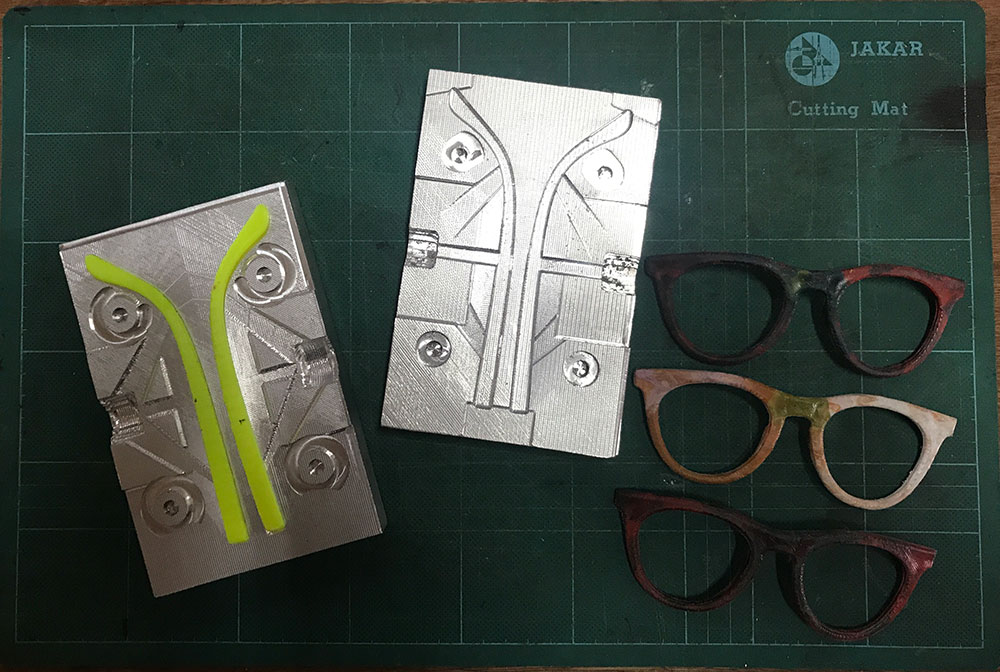
Once we were happy it was time to plan out the mould tool. This would be our most complicated mould to date for a number of reasons: firstly the parting line on the glasses is not a nice flat line on a plane, but rather wraps around the form that the glasses take – after all, flat glasses would be a bit dull! The second challenge was how to make a recess in the inside of the rim to secure the lenses.

With a bit of sketching and thinking we decided upon making a pair of lens inserts that would fit into the mould precisely and create the shape of the lens recess. These would have to be manually inserted and removed for each pair of glasses, but since we’re using the Precious Plastic injection moulder, cycle times are not really our main priority.
Thankfully Solidworks has a very powerful set of mould design tools built into the software, so we set about creating the parting lines, shut-off faces, mould base, injection points and gates that are all required to get the plastic to flow into the mould, release any air that is trapped and ensure a successful product comes out at the end.
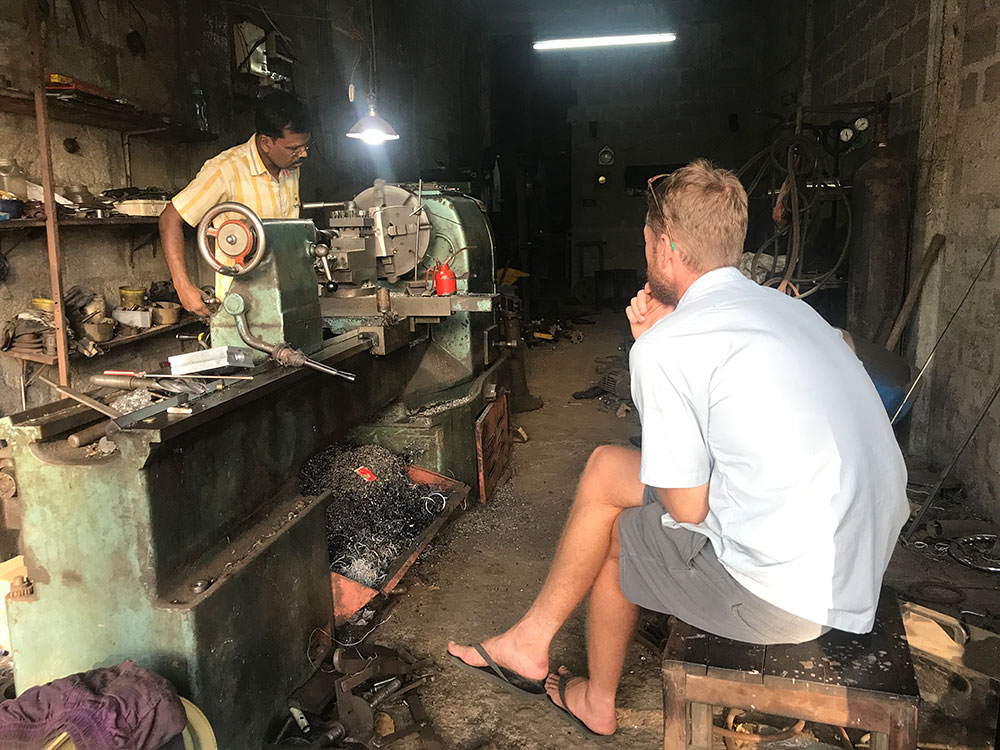
With the mould designed it was time to turn to our affectionately named Magic Aquarium, the Boxford VMC190 CNC machine. Thankfully, the cuts required for the main halves of the mould, i.e the front and back of the glasses, were not too complicated.
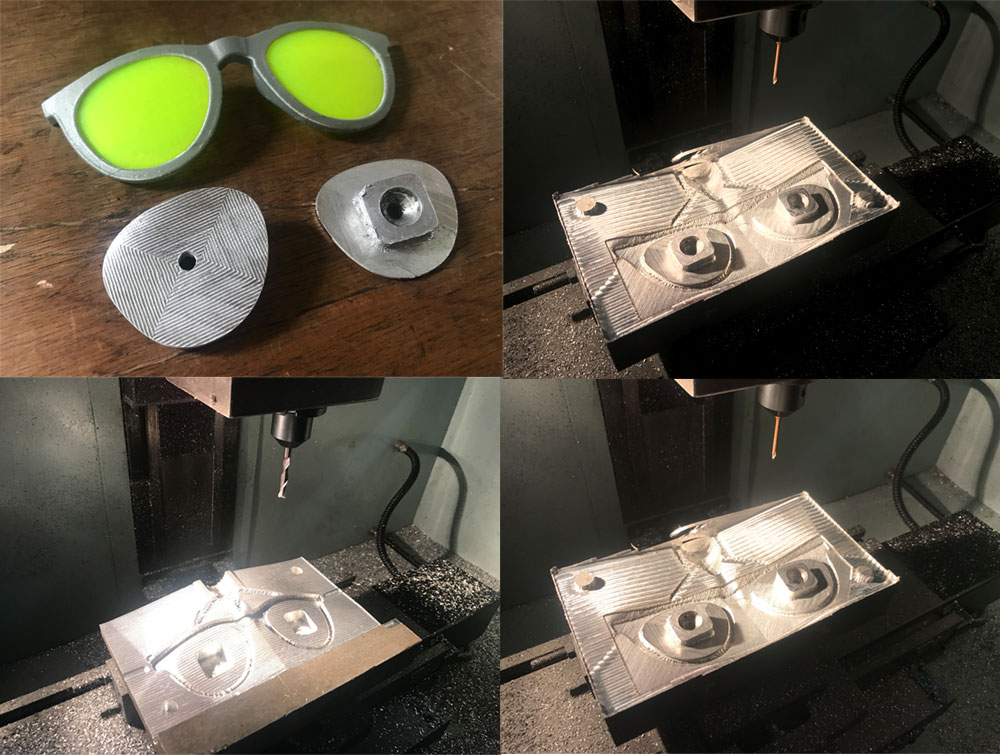
However, when it came to the inserts things became a little more interesting as these required our first attempt at ‘double sided machining’. That is to say we had to machine first one side, then turn them over, re-align the X and Y access EXACTLY and then machine the other side.
Due to the somewhat peculiar nature of the Boxford set up, the process took a few goes before we were reasonably confident that we had everything in the right place. To that end we had marked the exact location of the center line of the first side, which at least gave us something to aim for. There’s no doubt that an experienced CNC operator would do this without so much fuss and bother… but we were teaching ourselves and in the end the inserts came out pretty much exactly as we’d hoped. Well, almost.
Once the mould was ready it was time to head East to Arugam bay and deliver them in person to henry and Susi. Nope. It had nothing to do with the East Coast surf season being in full swing. Honest.
Since we were rushing a bit to meet a particular weekend, we didn’t have a chance to get down to the lathe shop and turn our signature thread into the mould halves, but we felt confident that we’d find an engineering shop that would be able to help us out.
First we tried Pottuvil, where we found a small repair shop with a large lathe merrily fixing bits of old Tuk Tuk. We waited. And waited a bit more. Then finally we got our chance in front of the Lathe Doctor. He took a look, took the time to understand what we were after and then explained that he had the ability to do pretty much every other thread size except the 1” BST pipe thread required for our purpose. Mmmmm. Or maybe it was just a little too close to dinner time.
Since it was late in the day we had to suspend our enthusiasm for the morning, at which time we set off for Akkaraipattu, a larger town further up the coast to the North. After a few failed attempts we eventually found the right guy, who not only stopped what ever else he was doing that afternoon to come and open his lathe shop, but also turned the thread into the mould and asked only Rs500/- in return. That’s less than $5!
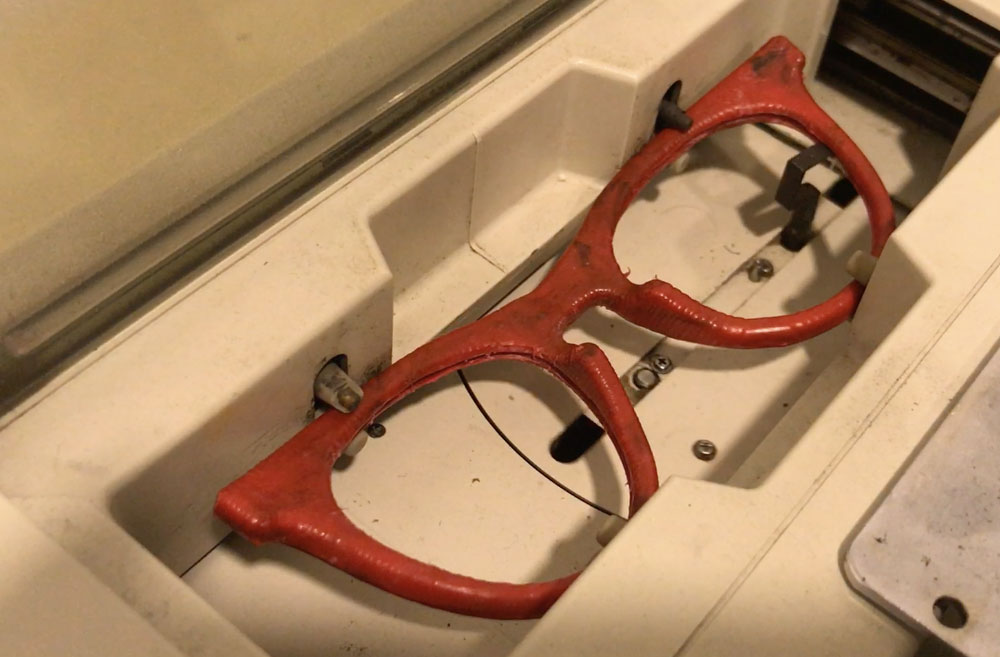
And so it was with more than a little bubbling excitement that we returned to Henry and Susi’s home with our newly ready sunglasses mould. We even called ahead to have Susi prepare the injector so that it would be ready when we got there. Of course, we had to have a celebratory Lion Beer too, just to steady the nerves and prepare our minds for being blown.
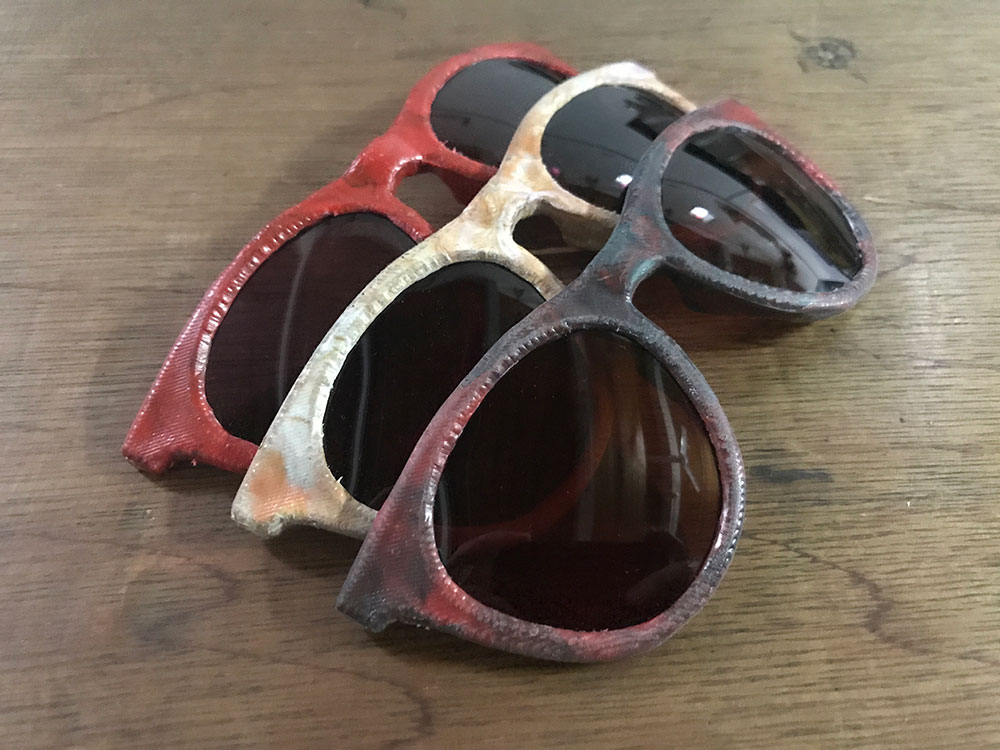
And so it was that after a few ‘short-shots’ and some judicious adding of vents that we had our first successful sunglasses frame mouldings, and some big smiles on all our faces.
Of course frames alone make for some pretty useless sunglasses, but we had bridged a pretty major hurdle. All that was left was lenses, hinges and arms… easy right?
Lee returned to Colombo with some frames in order to try an work out how to fit the lenses, and also to prepare the mould for the arms. After visiting a few opticians he ended up at Eric Rajapaksa’s where they lead him to a small back room with a somewhat magical lens cutting machine. After inserting the frame a little finger finds its way around the groove for the lens and records a exact impression of the shape. Then, in a different part of the same machine, a blank lens is inserted and then automatically cut to match the shape. You don’t have to be impressed, but we are!
The mould for the arms was reasonably straight forward, and we settled on a two cavity mould but with individual injection points. Our experience with the bag buckle mould told us that filling a double cavity mould is pretty hit and miss, so this way we only needed one mould, but each half should have a good chance of a successful filling.
Through a stroke of luck we managed to get some tiny hinges brought over from China by the Wonderful, the Amazing, Anam, former Colombo Design Studio employee and all round Super Woman. However, we still needed to find some tiny screws to attach the hinges to the glasses. Of all the problems, this one has been the most challenging. In the end we have had to order some M1.4 self-tapping screws from the UK, and we await their arrival with some trepidation.

We hope you’ve enjoyed this article. If you have any questions about the process, or if you’d like us to design some other product for you, or you’d just like to have a chat, please don’t hesitate to get in touch.